Not Afraid of Heavy Parts
Equipped with PolyWorks|Inspector™, Andritz Hydro faces quality control challenges that large-sized parts pose.
Headquartered in Graz, Austria, the Andritz Group (composed of Andritz Hydro, Andritz Pulp & Paper, Andritz Metals, Andritz Separation, and Andritz Automation) is a global leading supplier of plants, equipment, and services provided to hydropower stations, the pulp and paper industry, the metalworking and steel industries, and the municipal and industrial sectors for solid/liquid separation.
Over the past 170 years, Andritz Hydro has earned its reputation as a leader in the world market for hydraulic power generation. Today, it is a global supplier of electro-mechanical systems and services for hydropower plants. Andritz Hydro’s headquarters are in Vienna, Austria, and it has more than 50 locations in 20 countries worldwide. The company is organized in five main divisions as follows: Large Hydro, Service & Rehab, Compact Hydro, Generator Turbo, and Pumps. So, when it comes to hydropower, they know what they’re talking about.
The Challenge
Quality Control on Francis Turbines
Dedicated to the production of components for hydro power plants, such as turbo generators, turbines, and valves, the Andritz Hydro plant in Ravensburg, Germany, must ensure quality control for all of its parts, including heavy and massive parts like the Francis turbines that it produces.
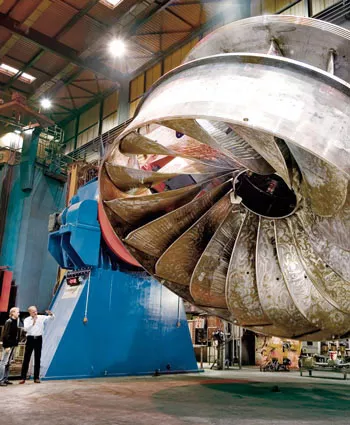
Generating up to 800 megawatts, a single Francis turbine is truly a beast. Composed of cast materials, a Francis turbine weighs in at 200 tons and measures nearly 8 meters in diameter. The power that this beast generates alone is impressive—it has been compared to generating the same amount of power as an average-sized nuclear power plant. Yet despite its extraordinary size and power, the Francis turbine is in fact a precision part. The efficiency of the turbine is entirely dependent on the accuracy of the blades and of their position. Quality control is crucial.
At 120 revolutions per minute, a slight deformation in a part can have devastating effects.

Francis Turbine for the Guri II power plant in Venezuela.
At Andritz Hydro, ensuring the quality control of a 200-ton part poses a unique set of challenges. For starters, the physical size of the Francis turbine is an obstacle that makes the task of taking measurements extremely difficult, and without the proper equipment, practically impossible. Add to that the fact that despite the massive size of these parts, precision needs to be at 1/100th of a millimeter.
Yener Korkmaz, Director of Test and Measurement at Andritz Hydro Ravensburg and responsible for quality assurance, inspection and repair of incoming goods, stated that “taking the measurements themselves, such as target points, alignment, analysis, etc., doesn’t pose a challenge, our key challenge really lies in accessing the part, since space is often limited and we physically cannot move to a better position.”
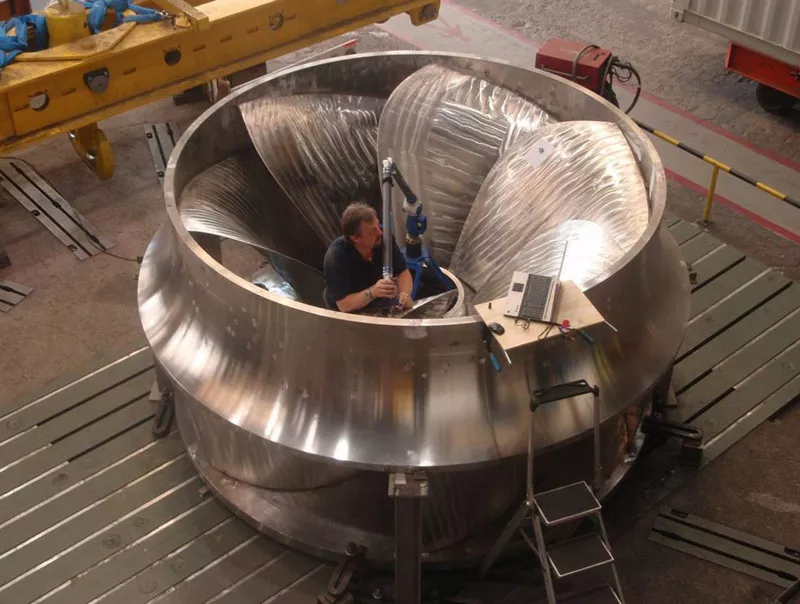
Due to the fact that the components are not freestanding on a measurement table, nor are they accessible from all sides, in the past, Korkmaz and his team had to resort to measuring the massive parts directly where they were being welded into place, i.e., among all the other parts and tools. Also, measurements taken with gauges were simply not precise because they varied according to the material of the gauge.
The Solution
Andritz Hydro turned to 3D metrology to perform the quality assurance on turbines. Since many of the measurement points on a turbine are partially hidden and access to them is limited, it was decided that a tactile measuring device would be the solution of choice. This was especially practical since the amount of points to be measured was not astronomical. The selected 3D metrology solution was a FaroArm, Faro laser tracker, and the PolyWorks|Inspector™ software. Equipped with this solution, the size and weight of a part were no longer obstacles.

The angle measurement of the shovels demands body exertion
PolyWorks|Inspector™ was selected to align and analyze the measurement data. In fact, Andritz Hydro had changed their alignment software for PolyWorks® three years prior; the main reason for this change was that although the alignment features of the previous software met the requirements, in terms of analysis and export data, PolyWorks offered several advantages.
Hans-Peter Klimm, Foreman in the Measurement and Testing Division at Andritz Hydro Ravensburg, appreciates the flexibility that PolyWorks offers and also, that he is not limited: "Most software solutions offer specific functions and if these functions don’t lead to the desired result, then it's over. In PolyWorks, we can use different paths to reach a goal. We use the many export and import options and the various interfaces, and this allows us to find creative solutions for specific problems."
“We chose PolyWorks because of the flexibility that it offered us and for its various reporting formats, and also because of the technical support that Duwe-3d provided!”
Korkmaz added that every department within the organization is treated as a customer, and they all have different data-processing requirements. PolyWorks has proven that it can seamlessly use each of the required formats. “We chose PolyWorks because of the flexibility that it offered us and for its various reporting formats, and also because of the technical support that Duwe-3d provided!” Korkmaz added. Korkmaz also greatly appreciated that his employees received basic training for the PolyWorks|Inspector software solution and that support for macro programming was available for them at the production site by Duwe-3d AG, based in Lindau.
Thanks to this 3D measurement solution, the challenges created by the enormous size of the part have been eliminated. Yet even with this solution in place, measuring these large-sized turbines is far from becoming routine work. This is in large part due to the fact that Andritz Hydro produces unique parts that are not serial, meaning that each wheel is custom to the customer’s requirements. Therefore, the measurement requirements always change. "Each turbine that we measure is a separate project altogether!" said Klimm.

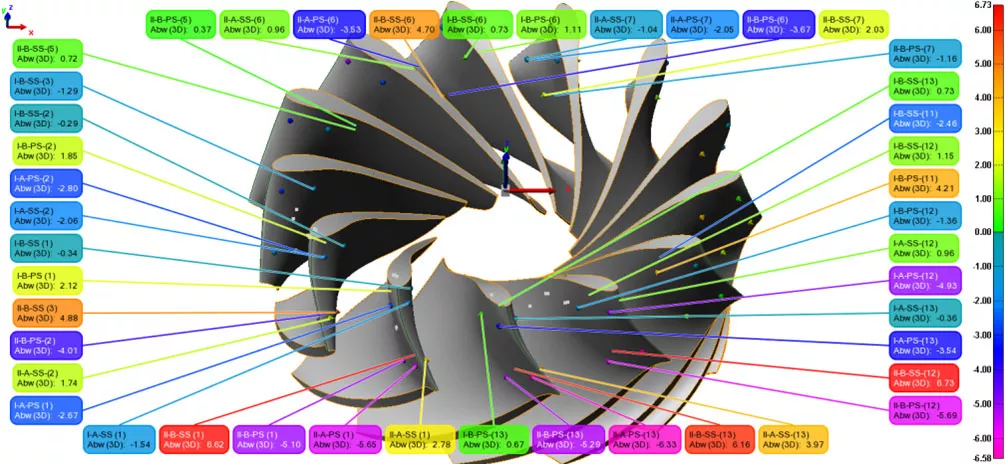
CAD model of a part in PolyWorks with reference and measurement points.
Change Device Location
The size and limited accessibility to the part require frequent relocation of the measurement arm or the tracker. Changing the position of the 3D measuring device is simplified by PolyWorks since it provides two ways to register the arm in the coordinate system:
- Via points measureable from several positions: points of the old position are still in reach of the new one
- By combining the tracker and the arm and registering the arm in the coordinate system of the tracker
When a location is changed, the arm takes its reference on the coordinate system of the tracker. PolyWorks automatically registers the arm in the tracker’s coordinate system, without requiring that additional reference points be taken.

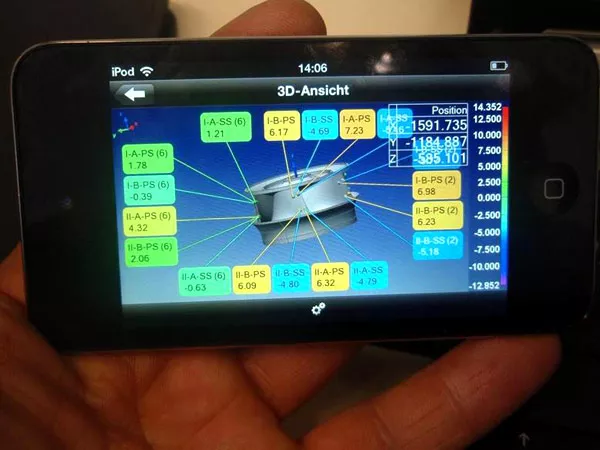
The project data can be triggered by an iPod using the PolyWorks|Talisman app.
"PolyWorks|Talisman™ is a very useful tool for us!"
For hard-to-reach test points, such as points that are deep inside a wheel or a shaft, the PolyWorks|Talisman™ application for Apple® mobile devices provides significant assistance.
"PolyWorks|Talisman is a very useful tool for us!” exclaimed Korkmaz. "If a colleague is missing or if the operator is in a precarious situation and can’t access the computer, it comes to the rescue," said Korkmaz. Measurements can be triggered via remote access and the project data can then be retrieved from the computer. The measurement technician can immediately validate the data and make any corrections if erroneous measurements occur.
The Benefits
Since many of the parts that need to be measured are large-sized, it is not uncommon for Andritz Hydro’s customers to build structures around the part to gain access to it. While these structures enable to examine the part in its entirety, they have a key drawback: space is limited. Therefore, simply measuring these parts in front of a customer with a big gauge was sometimes impossible or, at best, led to deviations.
The mobility that the 3D metrology solution offers makes it possible to perform quality control of parts of the supplier directly at the mounting location and even to support the installation of the turbines in the power plant. Working in areas where space is limited is no longer an obstacle.
Previously, it would take two technicians and up to 1½ days to measure a 100-ton blade (a significant amount of that time was spent getting the measuring equipment in place and working around the space limitations and all the wires and the solder). With the 3D metrology solution, the job can be completed in 2 hours—with a single technician.
Given the growing use of PolyWorks, Korkmaz says: "Using PolyWorks, we gain in precision and repeatability of the measurement results, which is crucial!"
The Future of PolyWorks in Andritz
The reliability of current 3D measurement techniques has allowed them to have more uses in Andritz. Now, it is not only used in quality control, but also used in parts manufacturing. Prior to the process to solder the component (such as the placement of solder roots), Andritz uses PolyWorks and a Faro laser tracker to determine the correct alignment of all components.
This case study was originally published in German by Duwe-3d.